Pages

Friday, October 28, 2011

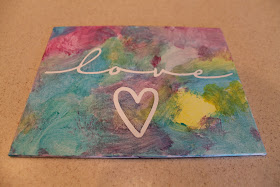
Child Painted Canvas

My kids love to paint and this is a great way to make their "abstract" masterpieces something extra special!


What you need:


  • Canvas
  • Paint
  • Brush
  • Alphabet Stickers (Located in the scrapbooking section at Michael's) or Die-Cut Vinyl Lettering
How to make it:
  • Place letter stickers on canvas to display your desired phrase.


  • Let your child paint the entire canvas.

  • Once dried, remove stickers. 


Linking to:


Wednesday, October 26, 2011

Chalkboard Wine Bottles


Chalkboard paint in a can is great stuff! This craft was extremely easy and can be used in so many different ways....home decor, vases, weddings. 


What you need:


  • Chalkboard Paint
  • Empty Wine Bottles
  • Chalk

How to make it:

  • Fill in the sink halfway with hot tap water and place bottles in the sink, label down.
  • Let it soak for about 30 minutes. 
  • Remove label and let bottles dry.

  • Once dried, spray the wine bottles with chalkboard paint. You may need to do two to three coats.
  • Using chalk, write anything you want!
Katie's Nesting Spot

Monday, October 24, 2011

Rootin' Tutu-in' Cowgirl

My son wanted to be Woody from Toy Story for Halloween, so I had to make my little girl a cowgirl to match. This is such an easy and ADORABLE costume to make for a toddler.


What You Need:
  • Blue Tulle (3-4 yards)
  • Crochet Headband to Match Tulle Color
  • Red Hankerchief (although pink would be really cute too)
  • Red Grosgrain Ribbon
  • Cowboy Hat
  • Cowboy Boots

How To Make Tutu:
  • Cut tulle into strips 4" wide by about 20" long (can adjust this to make tutu longer or shorter, fuller, etc.).
  • Place crochet headband around back of small chair or table legs to stretch out - this step isn't absolutely necessary, but sure makes life a lot easier when trying to thread through the strips of tulle. I've also seen it done by sitting down and stretching the headband over your thigh.
  • Fold single strip of tulle in half and insert folded end through opening at bottom of headband. Pull bottom ends of strip through to tie a knot.


  • Repeat knots through every opening at bottom of headband and that's it!


  • How to Make Rest of Costume:
    • Fold hankerchief in half diagonally and tie ends around back of your toddler. I was afraid it would fall down, so I took 2 pieces of ribbon and hand-stitched one end to the front of the hankerchief and tied the other ends around the back of her neck.
    • Put on cowboy hat and cowboy boots and now you've got yourself a rootin' tutu'in cowgirl!

    Notes:
    • Elastic can be used in place of the headband. Just measure your cowgirl's waist and subtract 3 inches, then sew ends together. Be sure not to tie the knots too tight on the elastic because it will cause it to stretch out.
    • The tulle tutu tends to be a bit sheer, so we wore little blue shorts underneath.
    • I also tied a little red scarf around her neck for a little extra flair!
    Other Tutu Costume Suggestions:

    • Make a white tutu and pair it with a white long-sleeved shirt or onesie with a ghost face on it (can glue on face with black felt or iron-on fabric) for a cute little ghost.
    • Make a black tutu and pair with a black shirt or onesie with either a cat face on it or "meow". Add cat ears and a tail for a really cute black cat.

    Tip Junkie handmade projects


    Free Time Frolics


    Thursday, October 20, 2011

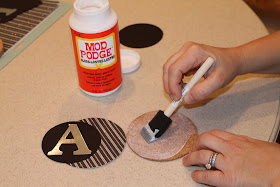
    Monogrammed Coasters

    These monogrammed coasters can be made to match any decor and would make a thoughtful hostess gift for the upcoming holiday parties.


    What You Need:


    • Round  Cork Coasters, 4" diameter (can be purchased at craft stores or cut out of a sheet of cork)
    • Scrapbook Paper
    • Monogram Letters Cut From Scrapbook Paper (sized no larger than 3.5")
    • Mod Podge
    • Glue
    • Acrylic Sealer
    How to Make It:
    • Place coasters on reverse side of scrapbook paper. Trace the shapes and cut out circles (if you have a die-cutting machine, you can also cut a 4" circle).
    • Glue paper circles onto coaster. For our project, we used 2 coordinating papers and cut a 4" circle from one and a slightly smaller circle from the other.

    • Center the monogram letters in the middle of the coaster and glue down.
    • Next apply several layers of Mod Podge over surface of coaster, allowing each layer to dry completely before applying another (Mod Podge goes on white, but dries clear)
    • Once Mod Podge dries, apply a good coat of acrylic sealer to help waterproof the coasters.


    Tuesday, October 18, 2011

    Acrylic Painted Vases

    A simple craft for the glass jars and vases you have hanging around at home. Just paint them and now they can be displayed. 


    What you need:


    • Glass Vases (Available at Goodwill or Dollar Tree)
    • Acrylic Paint

    How to make it:

    • Clean vase with hot, soapy water.
    • When completely dry, pour paint into the inside of the vase.

    • Swirl to coat vase completely. Then pour out excess paint to container for reuse.

    • Place vase upside down on paper towel for about 20 minutes.
    • Wipe the excess paint from the lip of the vase with a wet paper towel.
    • Let dry upright for 24 hours.
    Note : You can no longer use water in these vases.


    lil luna link party button

    Sunday, October 16, 2011

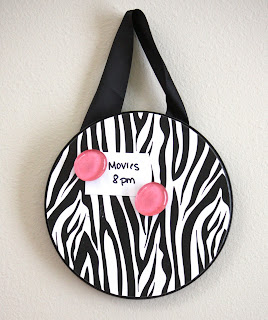
    Magnetic Memo Board

    This inexpensive and easy craft is a great way to add a little custom decor to your kitchen, kids' rooms, etc.


    What You Need:


    • Burner Covers (available in sets of 2 at Dollar Tree)
    • Spray Paint
    • Scrapbook Paper
    • Mod Podge
    • Ribbon
    • Hot Glue Gun


    How to Make It:

    • Place the burner cover upside down on reverse side of scrapbook paper. Trace the outline and cut out the circle.
    • Spray paint the burner cover in a color to coordinate with your scrapbook paper. Allow to dry completely.
    • Once dry, apply a coat of Mod Podge to the burner cover and glue down the circle of scrapbook paper. Let dry.
    • Apply several coats of Mod Podge over the top.
    • Hot glue ribbon to back side so you can hang up the memo board.
    • It is a great idea to make coordinating magnets. See tutorial here http://thedesperatecraftwives.blogspot.com/2011/10/scrapbook-paper-magnets.html


    Tuesday, October 11, 2011

    Framed BOO

    It seems we can't get enough Halloween decorations and this one is about as easy as it gets! This project takes about 5 minutes once you have the supplies.


    What You Need:


    • Black Collage Frame for Three 4x6 Photos (purchased ours at Michaels for $5 using coupon)
    • Halloween-Themed Scrapbook Paper, 4.5" x 6.5" size (three sheets)
    • B-O-O Letters Cut from Black Cardstock, approx. 3" size
    • Glue, Tape

    How to Make It:

    • Glue each letter onto center of each of three pieces of scrapbook paper (our letters were cut out using a Cricut Expression).
    • Remove back from frame. Take out matting.
    • Place paper behind matting so that the word BOO is aligned evenly showing through each space. Once each letter is centered, glue or tape into place.
    • Place back in frame and replace backing. Done!


    Katie's Nesting Spot

    Sunday, October 9, 2011

    Ghost Footprints

    This is a great keepsake and fun craft that involves your kids.


    What you need:


    • 8x10 or 4x6 Canvas
    • Black Acrylic Paint
    • White Acrylic Paint
    • White Glitter (Optional)
    • Googly Eyes
    • Your Kids Feet or Hands

    How To Make It: 
    • Paint canvas black with foam brush and allow to dry.

    • Paint the bottom of your kids hands or feet with white acrylic paint. Then place painted hands or feet on black canvas to apply print.
    • Sprinkle with glitter while white paint is still wet. 
    • Flip canvas over so print resembles ghost, and once dry, glue on googly eyes. 
    • Using a paint brush or paint pen write their names and year on the canvas.
    • If you used the glitter, we recommend using a spray acrylic sealer so the glitter doesn't get everywhere.