Showing posts with label Cookies. Show all posts

Tuesday, March 12, 2013

Desperate Craftwives Spring Crafts Roundup

Spring is in full swing around here! The kids are on Spring Break this week so I am going to put my crafting aside (even though I have a couple great Easter project ideas gnawing at me). But I don't want to leave anybody hangin' so here is a little roundup of my Spring projects from last year!


These Floral Embellished Eggs were super easy to make using styrofoam eggs, pins and little paper flower embellishments! 


My Salt Dough Easter Egg Garland is hands down my most popular post of all time. It has been featured on Baby Center, Retail Me Not, Tatertots & Jello, Chickabug, Care.com, and more!


My kids loved these cute Bunny & Carrot Easter Cookies! The carrots are kind of like eating vegetables, right?


I made this Spring Wreath using "mambo" yarn and it was a quick & easy project! Not sure I'd have the patience to make a yarn-wrapped wreath with regular skinny yarn!


Want to get the kids involved in making some Spring decor? These Coffee Filter Flowers were the perfect craft for little ones. They made a nice bouquet for Grandma on Mother's Day.


And, of course, the Magic Jellybeans. Have your kids plant them the Saturday before Easter, water them, and they will be amazed when the jelly beans magically bloom into Lollipop Flowers on Easter morning!


Happy Spring! Thanks for visiting my blog! I'd love to have you follow along or "Like" the Desperate Craftwives Facebook Page!

-Blythe


Places I'm Partying:

The 36th AVENUE

Tuesday, March 5, 2013

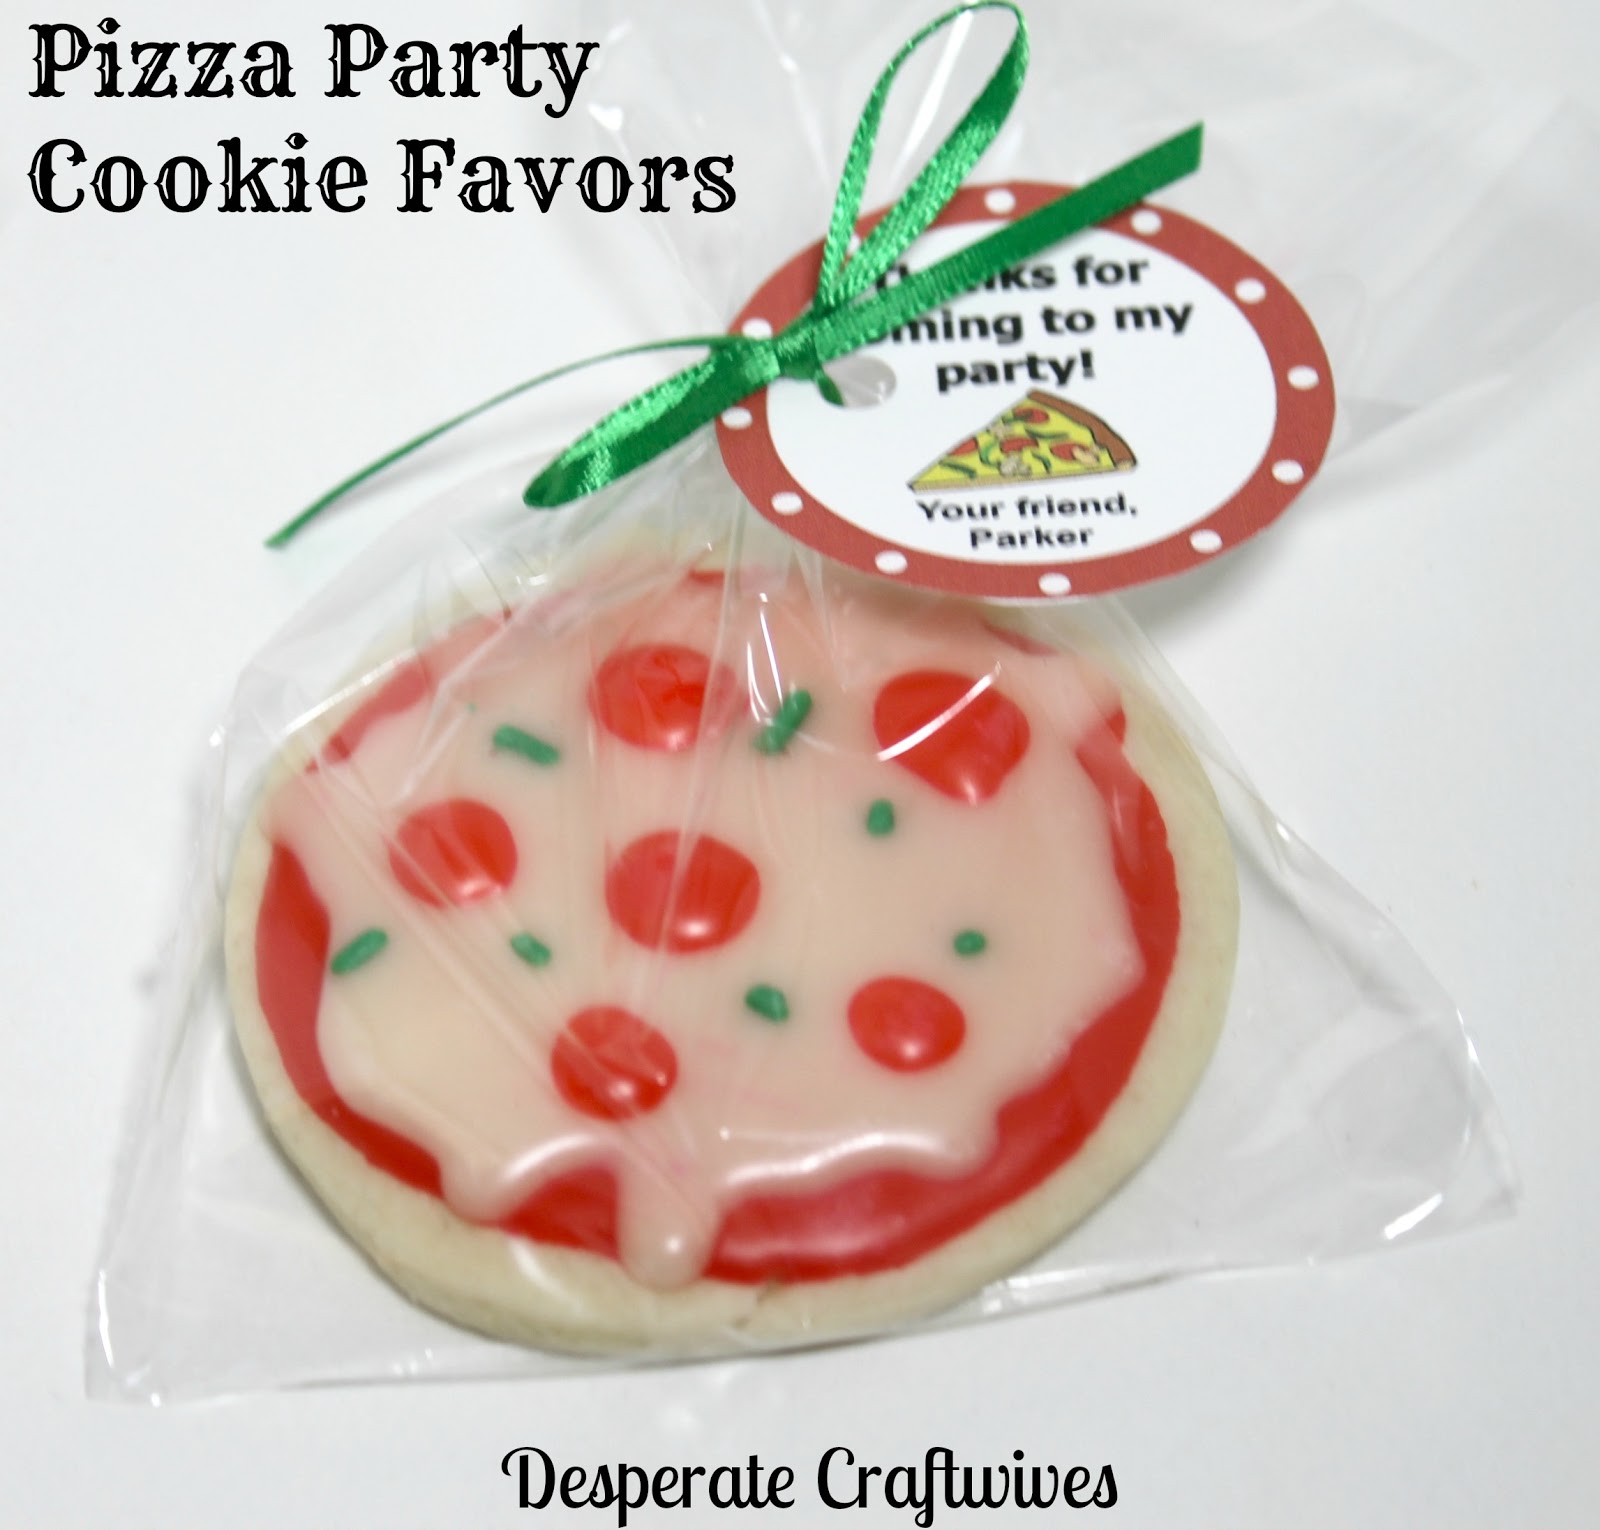
Pizza Party Favors

After years of begging, I finally gave in and let my son have his birthday party at Chuck E Cheese. I thought he had given up on the idea because when we went to his first party there last year, he was sitting up near the stage eating his pizza when the Chuck E Cheese character on the stage came to life and scared the bejeezus out of him. Then after we moved him to the other end of the table and convinced him that Chuck E Cheese was just a mechanical mouse attached to the stage, not a real giant mouse that could get him, a guy in a giant Chuck E Cheese costume came out and started making his rounds with the kids. My son almost fainted! But, like many other "traumatic" events in a young child's life, he got over it quickly, and resumed his campaign to have his own party there! Fortunately, he conquered his fear of Chuck E Cheese and had a great time (although he refused to go on the stage with the robotic one).The party was pretty much effortless. We just showed up with a cake and some favors.  I knew the kids would be cashing in all the tickets they won playing games for little trinkets, so I decided to keep it simple with the party favors and just made cookies for the kids to take home.And seeing as it was a pizza party......PIZZA COOKIES!


I used my favorite recipes for the cookies and icing:
The Best Rolled Sugar Cookies and Sugar Cookie Icing

We also had a special guest with a dairy allergy, so I made a batch of dairy free cookies that were super yummy!

DAIRY FREE ROLLED SUGAR COOKIES:

Ingredients
1 1/2 Cups Butter Flavor Crisco
3 TBSP Water
2 Cups Sugar
4 Eggs
1 Tsp Vanilla
5 Cups All Purpose Flour
2 Tsp Baking Powder
1 Tsp Salt

Instructions
Cream Crisco, Water and Sugar together. Add eggs and vanilla until well mixed.  Stir in flour, baking powder and salt. Cover dough with saran wrap and chill overnight. When ready to bake, roll out dough to about 1/4 inch thickness, cut with a circle cookie cutter and bake at 400 degrees for 6-8 minutes. Allow to cool before icing.

DAIRY FREE ICING: Mix 2 cups of powdered sugar, 1 tsp  clear vanilla, 4 tsp almond milk or soy milk and 4 tsp corn syrup until well blended. Add food coloring as desired. Add almond milk by the tsp to thin icing if it is too thick.


I decorated these pizza cookies by putting a layer of red icing in the center and letting it set, then used a squeeze bottle to squirt the "mozzarella" icing and adding a few green sprinkles before it set. Then once that layer was dry, I went back with my red icing and made the "pepperoni".

Then I just bagged them up and added a little tag I made using PicMonkey!


For these pizza cookies, I used the plain circle cookie cutter from www.cheapcookiecutters.com, although they have a really cool Pizza Slice Cookie Cutter and I would use that next time! I might even get motivated to make a little pizza box instead of a clear bag.

Ciao!!!
-Blythe

Places I'm Partying:

www.the36thavenue.com

www.lilluna.com

www.thenymelrosefamily.com

www.gingersnapcrafts.com

www.oneartsymama.com


www.becomingmartha.com

www.tatertotsandjello.com

Tuesday, October 23, 2012

Lavender Tea Party

A friend of mine had the cute idea to have a little girls tea party for her daughter's birthday. Fortunately it was a beautiful, sunny day here in Florida and perfect for an outdoor tea party! Since I love parties, especially girly ones, I offered to help with the decorations and to make cookies. I might have to steal her idea and have a tea party for my daughter's birthday this Spring!


This amazing teapot cake and cupcakes were made by Sugar Coated Sweets and Treats


I got the teapot cookie cutter from www.cheapcookiecutters.com and used my usual recipes of The Best Rolled Sugar Cookies and Sugar Cookie Icing (only change I made was using vanilla instead of almond extract in the icing).


I used various shades and textures of purple ribbon for this Ribbon Topiary (which I had actually made previously for a Tangled party). Here is the Ribbon Topiary Tutorial.


This was a very pretty party. My friend did a great job with the table settings, fancy hats for the little girls, and scones and other finger foods. Just looking at these pictures makes me crave tea and sweets!
-Blythe
Places I'm Partying:
Lil\'Luna
One Artsy Mama

HookingupwithHoHThe 36th AVENUE
WhipperberryPhotobucket

Monday, October 1, 2012

Creme Wafer Cookies

In case you missed this post when I shared it over at DJs Sugar Shack, here it is again because you won't want to miss this recipe!

I was lucky to be part of a bridal party back in July and stumbled upon these AMAZING cookies on a cookie tray at the wedding. I desperately sought out the baker of the cookies and begged for the recipe (fortunately it was my neighbor so I didn't have to beg too much)! They are so light & flaky & delicious & downright addictive!


Creme Wafer Cookies

Ingredients:
  • 1 Cup + 1/4 Cup Butter, Softened
  • 1/3 Cup Heavy Whipping Cream
  • 2 Cups All-Purpose Flour
  • 1/3 Cup White Granulated Sugar
  • 3/4 Cup Sifted Powdered Sugar
  • 1 Tsp Vanilla
Directions:
  • Mix 1 cup of softened butter with flour. Once well-combined, stir in heavy whipping cream. Chill at least 1 hour.
  • Preheat oven to 375 degrees.
  • Spread granulated sugar out on a piece of wax or parchment paper.
  • On a floured surface, roll dough to about 1/8" thickness. Using a shot glass, or pill bottle, cut dough into 1.5" rounds. Keep any dough not in use back in the fridge so it stays cold.
  • Place each round onto granulated sugar and turn to coat both sides.
  • Place rounds on an ungreased cookie sheet, prick several times with a fork and bake for 7-9 minutes. Cookies should look slightly puffy when ready.
  • While cookies are cooling, prepare filling: Mix 1/4 cup softened butter, 3/4 cup sifted powdered sugar, 1 tsp vanilla and food coloring.
  • Assemble cookies by spreading filling between 2 wafer rounds.
These cookies would be perfect for a tea party! Or a baby shower! Or a birthday! Or a Tuesday!

Enjoy!
Blythe
Places I'm Partying:
www.tipjunkie.com
www.cherishedbliss.com
www.the36thavenue.com

Too Much Time On My HandsPhotobucket
Addicted Button 2, Addicted to Recipes Butoon, v@Lil\'Luna

shabby creek cottage

Monday, August 13, 2012

Pool Party Cookies

I am busy working on some craft projects and will post about them shortly, but in the meantime I thought I'd share pictures of some cookies I made for a fun birthday pool party we went to over the weekend!


I used my favorite recipes for cutout cookies:

And my cutters came from www.cheapcookiecutters.com
That's where I got the great cutters for these cookie monster cookies I made recently too!


Places I'm Sharing My Cookies:
The 36th AVENUEOneCreativeMommy.com

Monday, August 6, 2012

Cream Cheese Filled Snickerdoodles

I was planning to make a cookie tray for a party I was attending and wanted to try a new cookie recipe. Like many other "Pinheads", I went straight to Pinterest and searched for "the best cookies ever" or something like that. I pretty much started drooling when I saw these Cream Cheese Filled Snickerdoodles from Cookies and Cups. My search for "the best cookies ever" did not disappoint!


What You Need:
Cookies:
  • 1 1/2 cups sugar
  • 1 cup salted butter, softened
  • 2 eggs
  • 1 teaspoon vanilla
  • 2 3/4 cups all purpose flour
  • 2 tsp cream of tartar
  • 1 tsp baking soda
  • 1/4 teaspoon salt
  • Cinnamon-Sugar Mix (mix 1/4 cup sugar w 2 teaspoons cinnamon)
Filling:
  • 8 oz. cream cheese, softened
  • 1/4 cup sugar
  • 2 teaspoons vanilla
Instructions:
  1. Make filling by mixing cream cheese, sugar and vanilla.  Cover and refrigerate for at least 30 minutes.
  2. Cream butter and sugar together until fluffy.
  3. Add eggs and vanilla and mix well.
  4. Mix in flour, cream of tartar, baking soda and salt, using low speed.
  5. For each cookie, roll 1 tablespoon of dough into a ball and flatten into a disk approx. 2 inches diameter. Repeat - will need 2 discs for each cookie.
  6. Place 1 teaspoon of cold cream cheese mixture in middle of one disc, then place other disc on top, pressing down around edges to seal. Next, carefully roll into a ball and roll in cinnamon sugar mix.
  7. Put cookie on plate and refrigerate. After making each one, put in refrigerator. It is important that these cookies stay cold before baking.
  8. Once all cookies have been made, allow them to chill for at least 15 minutes.
  9. While cookies are chilling, preheat oven to 400 degrees.
  10. Bake on parchment-lined cookie sheet for 8-10 minutes, leaving about 2 inches between cookies.
  11. Cool on wire rack.
  12. Once cool...place several on a plate for people to taste and "oooh" and "aaah" over. Then hide the rest of the cookies so you can eat them yourself. Yes...they are that good. 

Places I'm Partying:


shabby creek cottage
Tip Junkie handmade projectsSee Vanessa CraftWhipperberryPhotobucketKatie's Nesting SpotOne Artsy Mama
Too Much Time On My HandsOneCreativeMommy.com