Showing posts with label Mod Podge. Show all posts

Monday, February 20, 2012

Nursery Wall Letters

For both my kids and my cousin's daughter, I handpainted letters for their nurseries. With baby cousin #2 due to arrive in a few weeks (you'll never guess what her name is going to be!), I decoupaged them and WOW! did they turn out great and they took about a tenth of the time of handpainting them!


What You Need:
  • White Wooden Letters (available at craft store)
  • Patterned Cardstock
  • Mod Podge
  • Scissors, Pencil
  • Foam Brush
  • Fine Grit Sandpaper

How To Make Them:
  • Place letter backwards on back side of paper and trace outline.
  • Cut letter shape out of paper.
  • Apply thin coat of Mod Podge to wooden letter and align paper letter on top, smoothing down. Let dry.
  • If there is excess paper around edges of letter, either trim with scissors or smooth edges down with a fine grit sandpaper.
  • Apply at least two thin coats of Mod Podge, allowing each one to dry completely before applying the next.
  • Note: if you don't want white edges, paint them with acrylic paint before applying Mod Podge. I ended up painting a coat of white paint to brighten up the edges.
Places I'm Partying:

 
My entry to  the appliances online  crafty creations competition. You can enter too at Lil’luna!


Tuesday, February 7, 2012

Baby Girl Wreath

We will be welcoming a new baby cousin into the family in just a few weeks (squeal!!!). I wanted to make something special for her nursery and I've been on a bit of a wreath-making kick lately, so.......


What You Need:
  • Wreath Form
  • Ribbon
  • Straight Pins
  • Felt
  • Wooden Letter
  • Needle & Thread
  • Mod Podge, Hot Glue
How You Make It:
  • Cut ribbon into lengths long enough to go around wreath form with a bit of overlap.
  • Wrap alternating pieces of ribbon around wreath and secure in place with straight pins until entire wreath is covered.
  • Apply a coat of Mod Podge to the back where the ends of the ribbon are to prevent fraying.
  • Make felt flowers: Cut a strip of felt approximately 2"x12". Fold in half lengthwise and sew ends together. Once sewn, cut slits down entire length about 3/4 of the way to the bottom. Next, starting with one end, roll up into flower and sew through bottom to secure

  • Paint wooden letter to match ribbon and let dry.
  • Glue on felt flowers and wooden letter with hot glue.


Places I'm Partying:

Tip Junkie handmade projects


The 36th AvenueToys In The DryerSee Vanessa Craft

shabby creek cottage


Monday, November 14, 2011

Photo Coasters

These coasters came out beautiful. We loved them so much that we plan to make more! They make great gifts and are a nice way to display your favorite photos. 


What you need:
4x4 White Tiles
Pictures
Mod Podge
Brush
Epoxy Resin
Adhesive Felt Mounting Circles or Cork Board


How to make it:

  • Cut pictures to 4x4 to fit tile.

  • Using a foam brush, apply a thin coat of Mod Podge to the top side of tile and align picture on top and press down to adhere.
  • Once dry, apply a coat of Mod Podge over entire picture. Allow to dry.

  • Follow instructions per label on mixing resin.
  • Elevate your tile with a cup on aluminum foil or wax paper.
  • After mixing resin with hardener, pour on tile. Spread it out using popsicle sticks. 
  • Use a lighter to pop bubbles.
  • Allow at least 72 hours to dry to harden. If needed let it dry longer. 
  • Once dry, stick 4 of the felt circles on the bottom of each tile or cut corkboard to fit tile and glue on the back of tile.
  • Then stare at how pretty they look!

Note: The reason you elevate the tile is so the additional resin on your tile drips down instead of drying on to the tile. If you place the resin on a flat surface and it dries on the tile, simply cut it out.
The Girl Creative


Happy Go Lucky

Tip Junkie handmade projects
lil luna link party button
http://www.bluecricketdesign.net/


The 36th Avenue

shabby creek cottage


http://thirtyhandmadedays.com/


Wednesday, November 9, 2011

Embellished Vases

We found these ceramic vases on clearance at Michaels and grabbed them, then walked down the aisle with all the little embellishments in the scrapbooking section when inspiration struck! We transformed a couple of plain, swamp-colored vases into pretty patterned ones!


What You Need:
  • Ceramic Vases
  • Embellishments (we used little paper flowers and crystal stickers)
  • Spray Primer
  • Spray Paint (we used blue and white)
  • Mod Podge or Glue


How To Make It:
  • Adhere the embellishments to sides of ceramic vases. We used Mod Podge to glue little flowers all over one vase, and just stuck the patterned crystal stickers on the other.
  • Once vases are covered, spray with primer.
  • Once primer completely dry, spray paint vases in color of choice and let dry.
shabby creek cottage


Thursday, October 20, 2011

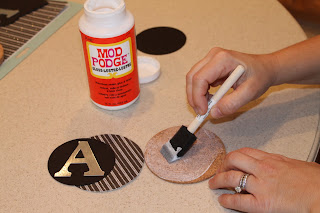
Monogrammed Coasters

These monogrammed coasters can be made to match any decor and would make a thoughtful hostess gift for the upcoming holiday parties.


What You Need:


  • Round  Cork Coasters, 4" diameter (can be purchased at craft stores or cut out of a sheet of cork)
  • Scrapbook Paper
  • Monogram Letters Cut From Scrapbook Paper (sized no larger than 3.5")
  • Mod Podge
  • Glue
  • Acrylic Sealer
How to Make It:
  • Place coasters on reverse side of scrapbook paper. Trace the shapes and cut out circles (if you have a die-cutting machine, you can also cut a 4" circle).
  • Glue paper circles onto coaster. For our project, we used 2 coordinating papers and cut a 4" circle from one and a slightly smaller circle from the other.

  • Center the monogram letters in the middle of the coaster and glue down.
  • Next apply several layers of Mod Podge over surface of coaster, allowing each layer to dry completely before applying another (Mod Podge goes on white, but dries clear)
  • Once Mod Podge dries, apply a good coat of acrylic sealer to help waterproof the coasters.