Showing posts with label paint. Show all posts

Monday, February 13, 2012

Valentine Champagne Flutes

With Valentine's Day just around the corner, and chocolates and champagne bottles stocked all over the front of the grocery store, I knew it was time to bust out my Martha Stewart Adhesive Stencils and make some valentine champagne flutes. These would make a great gift or add a nice touch to a romantic night with your sweetie.

What You Need:
  • Martha Stewart Adhesive Stencils (got mine at Michaels)
  • Martha Stewart Craft Paint
  • Champagne Flutes
  • Stencil Brush or Pouncer
How To Make It:
  • Clean and dry champagne flutes.
  • Apply adhesive stencils.
  • Apply paint with stencil brush or pouncer (make sure you don't get too much paint on brush or it will seep beneath stencil).
  • Remove stencil while paint is still wet. 
  • Allow paint to dry and wash stencils with warm water and soap (they are re-usable!).

Places I'm Partying:


Sumo's Sweet Stuff

Thursday, February 9, 2012

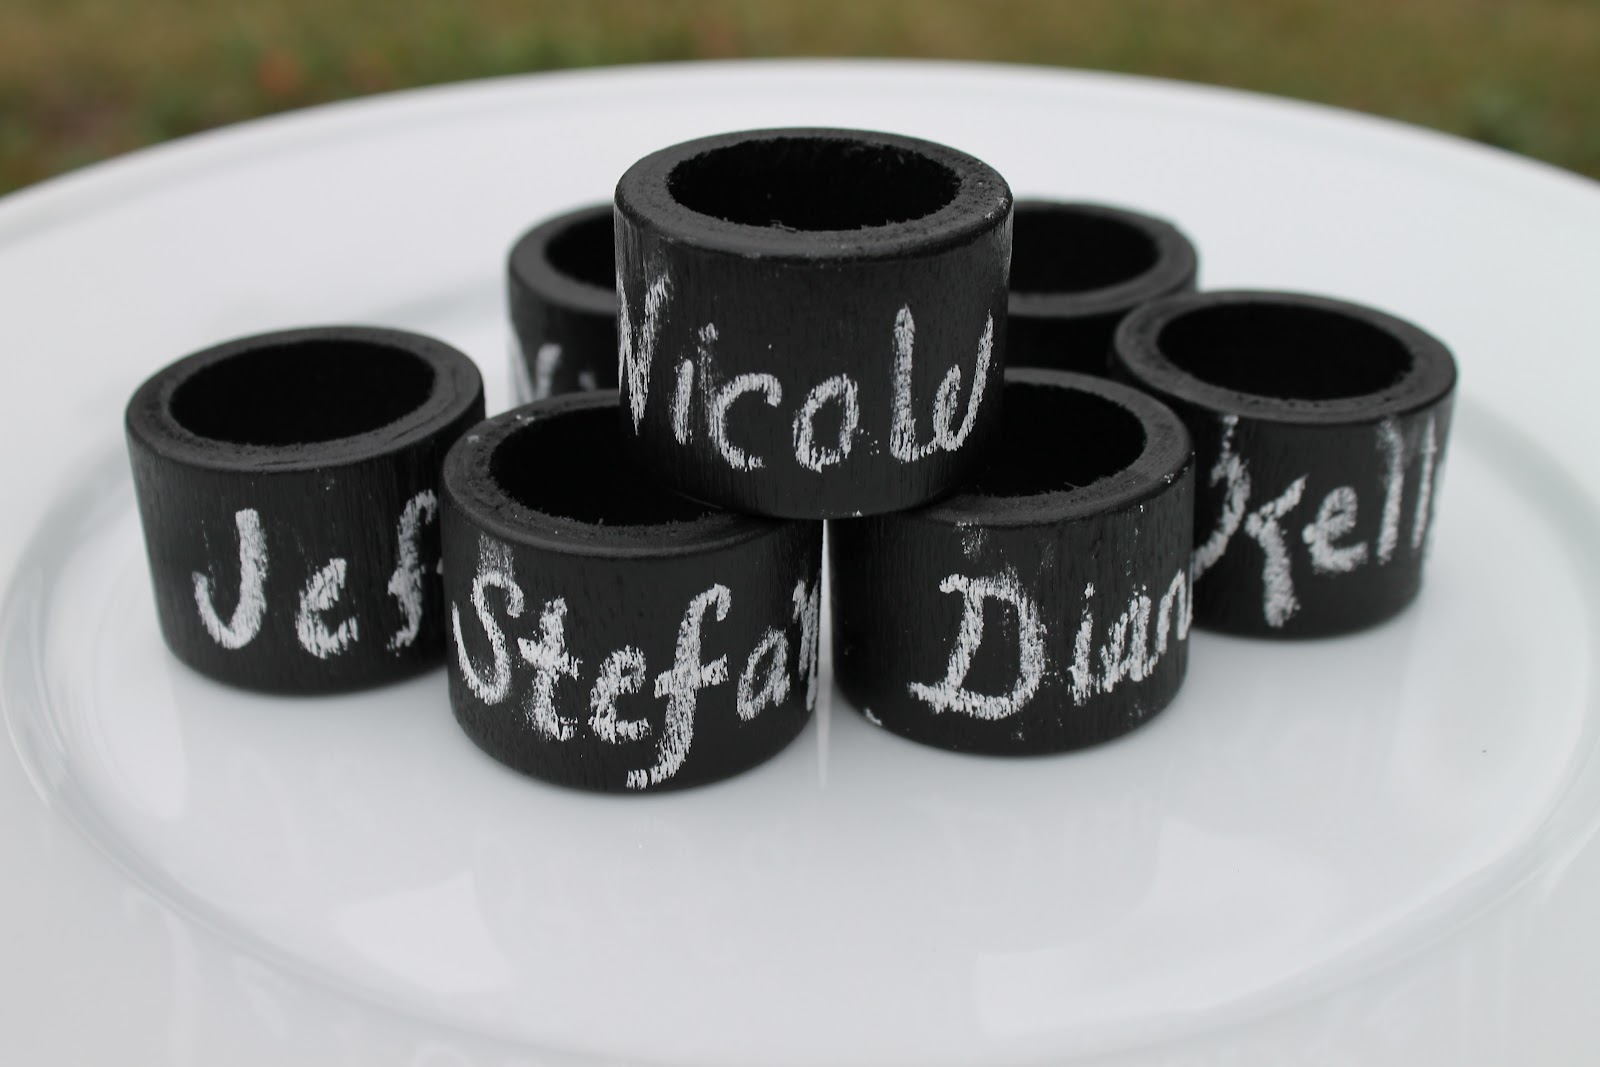
Chalkboard Napkin Rings

Some projects come along that are so simple, yet so brilliant. Like this one....Chalkboard napkin rings. I bought some plain wooden napkin rings months ago and planned to make these before Thanksgiving, but other holiday projects got in the way. It was so quick & easy, I don't know why I waited!


What You Need:

How to Make It:
  • Simply Paint wooden napkin rings with chalkboard paint, at least 2 coats, and let dry. DONE!!!

Places I'm Partying:
www.lilluna.com
www.bluecricketdesign.net


Tip Junkie handmade projects

Tickled Pink at 504 MainSee Vanessa Craft
I Heart Nap Time
Sumo's Sweet Stuff
The DIY Dreamer


IhookedupwithHoHlamespiceshabby creek cottageA Glimpse Inside


Tuesday, February 7, 2012

Baby Girl Wreath

We will be welcoming a new baby cousin into the family in just a few weeks (squeal!!!). I wanted to make something special for her nursery and I've been on a bit of a wreath-making kick lately, so.......


What You Need:
  • Wreath Form
  • Ribbon
  • Straight Pins
  • Felt
  • Wooden Letter
  • Needle & Thread
  • Mod Podge, Hot Glue
How You Make It:
  • Cut ribbon into lengths long enough to go around wreath form with a bit of overlap.
  • Wrap alternating pieces of ribbon around wreath and secure in place with straight pins until entire wreath is covered.
  • Apply a coat of Mod Podge to the back where the ends of the ribbon are to prevent fraying.
  • Make felt flowers: Cut a strip of felt approximately 2"x12". Fold in half lengthwise and sew ends together. Once sewn, cut slits down entire length about 3/4 of the way to the bottom. Next, starting with one end, roll up into flower and sew through bottom to secure

  • Paint wooden letter to match ribbon and let dry.
  • Glue on felt flowers and wooden letter with hot glue.


Places I'm Partying:

Tip Junkie handmade projects


The 36th AvenueToys In The DryerSee Vanessa Craft

shabby creek cottage


Wednesday, November 23, 2011

Stenciled Christmas Signs

I had a roll of contact paper staring at me from my kitchen counter, so decided to use it with my Cricut to make adhesive stencils for painting some cute Christmas signs.


What You Need:
  • Contact Paper or Vinyl
  • Martha Stewart Holiday Adhesive Stencils
  • Wood or Canvas
  • Acrylic Paint, Regular and Glitter
  • Stencil Brush or Pouncers
  • Ribbon (optional)
  • Hot Glue


How To Make It:
  • Use Cricut or Silhouette to cut out letters for stencil. Can cut by hand if you are ambitious and without die-cutting machine.
  • Paint background color onto canvas or wood.
  • Place adhesive word stencil onto canvas or board.
  • Dip stencil brush or pouncer into paint and dab off excess paint. Paint letters onto sign. Be careful not to use too much paint on brush. Apply second coat if necessary.
  • Place Martha Stewart Adhesive Stencils onto sign and paint to add little design accents. I used the reindeer on the green sign and snowflakes on the blue sign.
  • Once paint dry, glue strips of ribbon to the top and bottom of sign for a little extra flair, if desired.
  • Use hot glue or staple gun to affix ribbon to top of sign for hanging.
Note: I love the way the "Let It Snow" sign turned out, but the snowflakes are only really visible in bright light, so I would recommend painting one layer of white acrylic paint with the crystal glitter paint on top.


Places We're Partying: